


ColumnTransformer: Apply Different Transformations To Different Features


Real-world data often contain heterogeneous data types. Most of the time you will find an unorganised or incomplete dataset with missing values. You may need to use different transformation on different columns for data preprocessing.
For example, scale the numerical features, one-hot encode the categorical features or replace missing values with mean value in one column and constant in other and so on.
Earlier it was a long and challenging task. But now, rather than having to handle each of these separately and then concatenate them, or perhaps writing a function to apply, you can use ColumnTransformer.
What Is ColumnTransformer?
ColumnTransformer allows different columns or column subsets of the input to be transformed separately and the features generated by each transformer will be concatenated to form a single feature space. - documentation
In simple words, it allows you to selectively apply data transforms to different columns in your dataset and later it combines them to form a single dataset. Don't worry if you still didn't get it. We will look at an example to get a better overview.
We will be using Walmart Sales Dataset
Import
import pandas as pd
import numpy as np
Load Data
df=pd.read_csv("Train.csv")
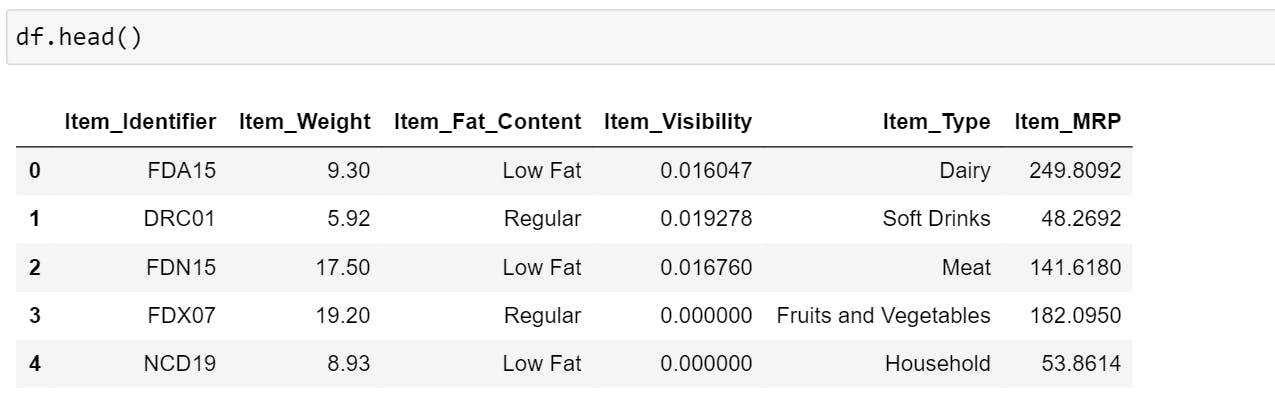
Let's look at the data, (for explanation purpose we will only look at the first 5 columns of the dataset).
Check if we have any missing values.
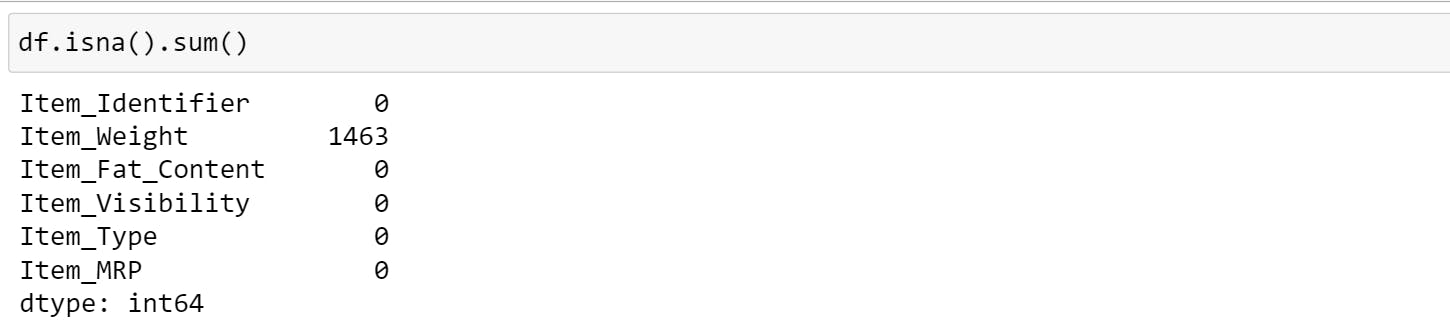
Item_Weight has 1463 missing values, we need to fill it with the mean value.
Check the datatypes of each column,
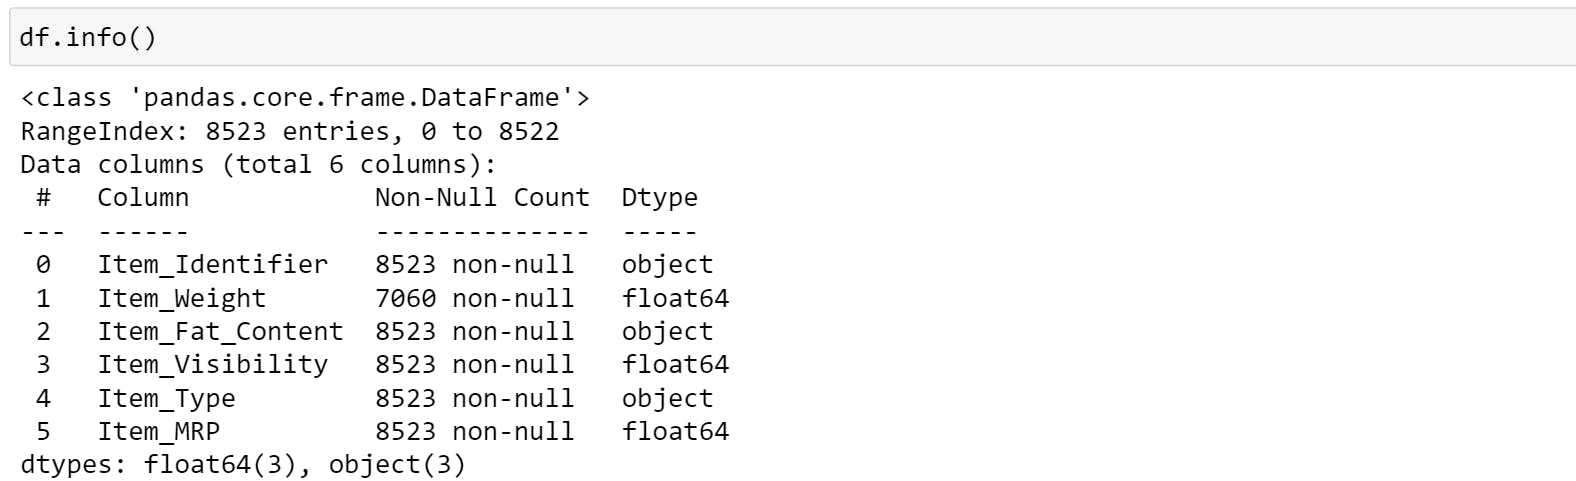
Most of the machine learning algorithms cannot operate on label data directly. They require all input variables and output variables to be numeric. So, categorical data must be converted to a numerical form.
This means we need to use two different transforms on different columns:
- Fill the missing values in Item Weight using SimpleImputer
- Convert 3 categorical columns to numeric using OneHotEncoder
Before performing the below operations, you need to split the data into train and test data in order to avoid data leakage.
Then,
We need to import all the packages in order to use them.
from sklearn.compose import ColumnTransformer
from sklearn.impute import SimpleImputer
from sklearn.preprocessing import OneHotEncoder
The ColumnTransformer constructor takes quite a few arguments, but we’re only interested in two.
The first argument is a list of tuples. The array has the following elements in the same order:
- name: a name for the column transformer, which will make the setting of parameters and searching of the transformer easy.
- transformer: Estimator.
- column(s): the list of columns which you want to be transformed.
The second parameter we’re interested in is the remainder. This will tell the transformer what to do with the other columns in the dataset that are not mentioned in ColumnTransformer.
In our case, we will set the remainder as "passthrough" which means don't do anything. You can also drop the remaining columns by setting the remainder as "drop".
ct = ColumnTransformer([
    ("Step1", SimpleImputer(missing_values=np.nan, strategy="mean"),["Item_Weight"]),
    ("Step2", OneHotEncoder(sparse=False, handle_unknown ="ignore"),["Item_Identifier","Item_Fat_Content","Item_Type"])
],remainder="passthrough")
Once we have constructed this columnTransformer object, we have to fit and transform the dataset.
df2=ct.fit_transform(df)
To view the data, we will first convert it into DataFrame.
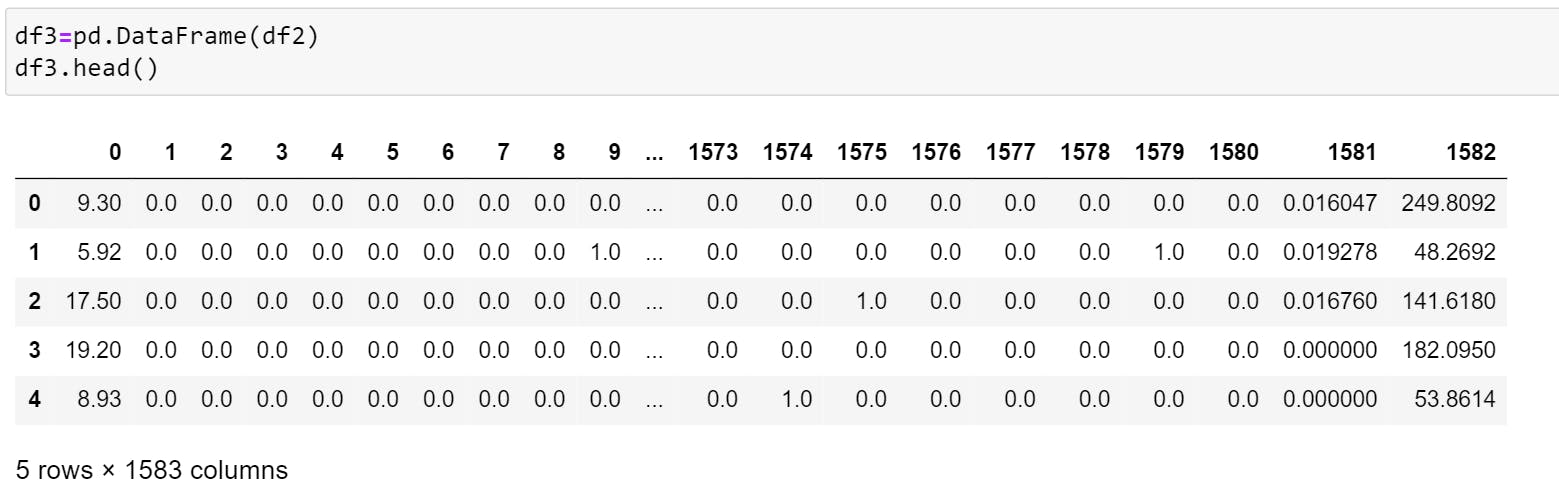
The number of columns has increased due to the conversion of categorical feature to numeric.

If you compare the first and the second image (after conversion and before conversion), you will notice that the first column in DataFrame ("df3") represents Item_Weight and the last column represents Item_MRP.
Let's check if Item_Weight has any null value,

As you can see, it was so easy and was done with hardly two lines of code.
Important Note: Here I have taken an example to show how to use ColumnTransformer. But in your projects, make sure to split the data into train and test data before using ColumnTransformer to avoid data leakage.
You can also use make_column_transformer instead of ColumnTransformer.
This is a shorthand for the ColumnTransformer constructor. Here you don't need to name the transformers. Instead, they will be given names automatically based on their types.
To use it, you need to import package,
from sklearn.compose import make_column_transformer
Syntax is the same, but this time you don't need to mention the name.
ct = make_column_transformer(
    (SimpleImputer(missing_values=np.nan, strategy="mean"),["Item_Weight"]),
    (OneHotEncoder(sparse=False, handle_unknown ="ignore"),["Item_Identifier","Item_Fat_Content","Item_Type"]),remainder="passthrough")
And then fit and transform using the below code,
df2=ct.fit_transform(df)
There is no such major difference between the two. They both give the same result as you can see from the above example.
ColumnTransformer uses a list of a tuple with a name and make_column_transformer is just a tuple without a name. The name given to tuple is helpful when we use Gridsearchcv or Randomsearchcv.
I hope you got a better understanding of this concept. Thank you for reading.